
Description
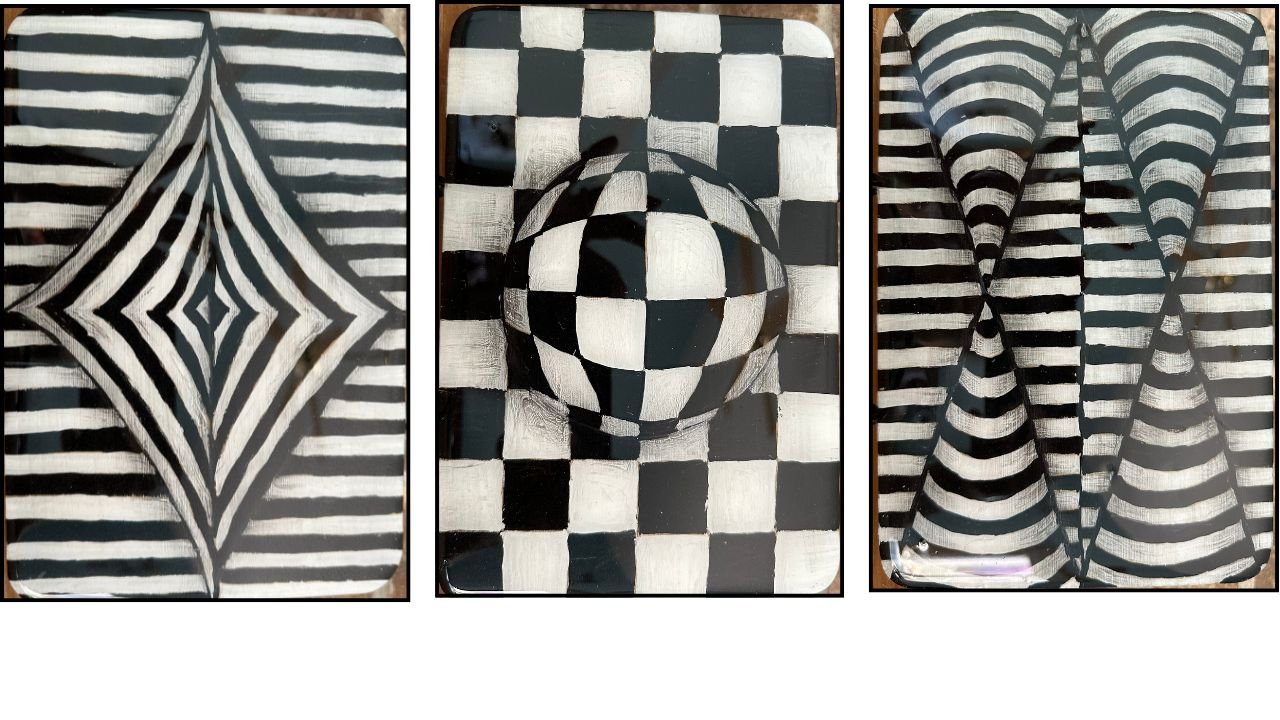
These striking optical illusion designs were hand-painted on simple Dollar Tree wooden cutting boards. Once the artwork was complete, a glossy layer of resin was poured on top, giving the pieces a sleek, glass-like finish that makes them look like high-end, store-bought art!
Backstory
Creating optical illusion art had been on my mind for a long time, but I wasn’t sure how to make it fit within my DIY niche. I kept brainstorming ways to merge the idea with recycled or affordable materials. While browsing Dollar Tree, I stumbled upon these wooden cutting boards, and suddenly everything came together. I transformed them into modern resin wall art with a high-end, glass-like finish.
Materials Used
- Wooden Boards Or Dollar Tree Cutting Boards
- Acrylic paints
- Pencil
- Paper
- Transfer paper
- Paint Brushes
- ResinFor those of you who prefer
Step-By-Step Written Instructions
- First I sanded the Dollar Tree wooden cutting boards to prepare them for painting and set them aside.


2.


If you want to watch drawing in action it starts at 0:16 sec and ends at 2:28. in the you tube video.
3. Next using the carbon paper I transferred the drawing on the wooden board.


4. Next I painted the pictures with black and white paints.


5. Next, I used a pencil to add shading and create a 3D effect on the painting. I first applied pencil to certain areas, then gently smudged it with my finger to blend the shading and enhance the depth
To see the shading in action it starts at 4:13 and ends at 5:01 on the youtube video.
Below you can see how the shading creates a 3D effect.
In the photo I finished shading only bottom part of the picture and you can see the difference between top and the bottom part


6. Next I poured epoxy resin on the boards. When the Resin dried I displayed these art pieces.


In the photo above, you can see a slight glass effect. I recommend watching the video to view the glass effect more clearly
Note:
In one of the photo it seems like resin has dissolved pencil in it making the photo dark or muddy but in person it doesn’t look this dark. I dont know why only one photo has this effect
Tip:
Instead of using resin, you can apply 3–4 coats of gloss varnish to add shine to the pictures. However, I’m not sure whether the varnish will smudge or dissolve the pencil shading. If you decide to try it out, I’d love to hear what you discover
Final Note:
I hope you enjoyed this illusion art with a twist! I’d love to hear your thoughts. Please leave your comments and suggestions in the comments box below.
For more craft ideas, please subscribe to my newsletter.
Feel free to explore my other DIY posts here on the blog. Who knows, you might find your next inspiration and create a masterpiece of your own!
Thanks so much for visiting!