Description:
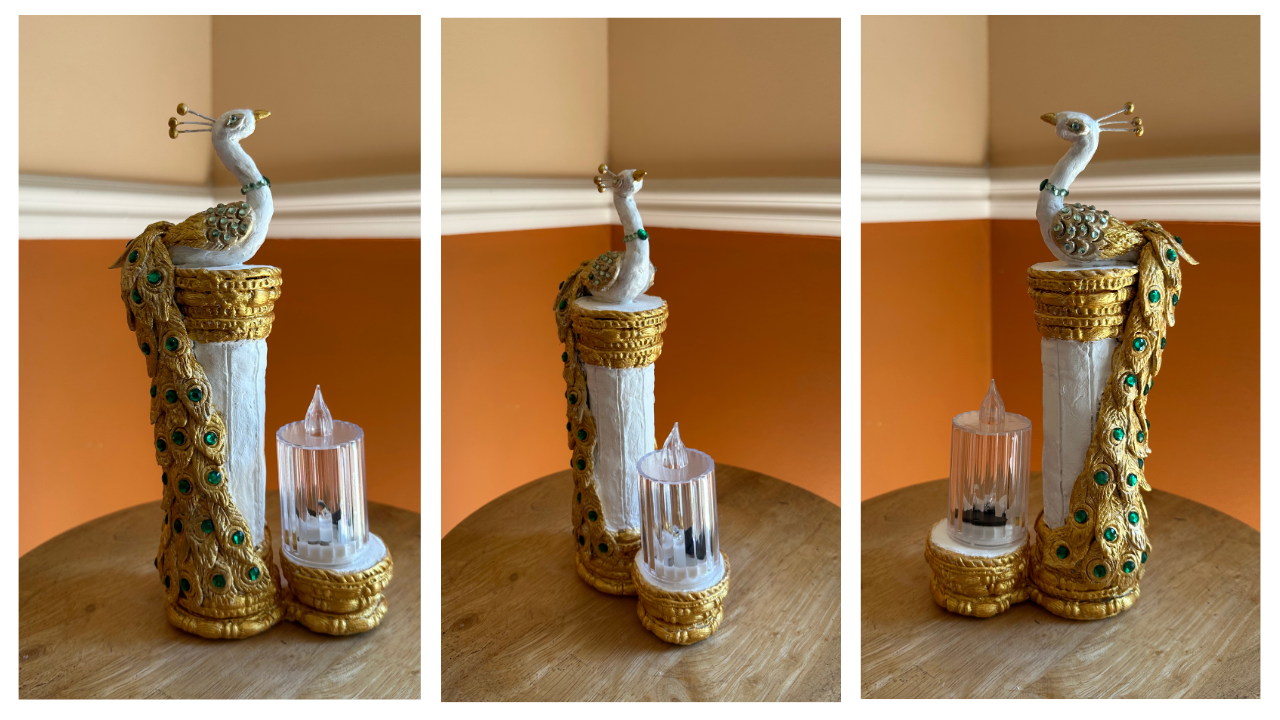
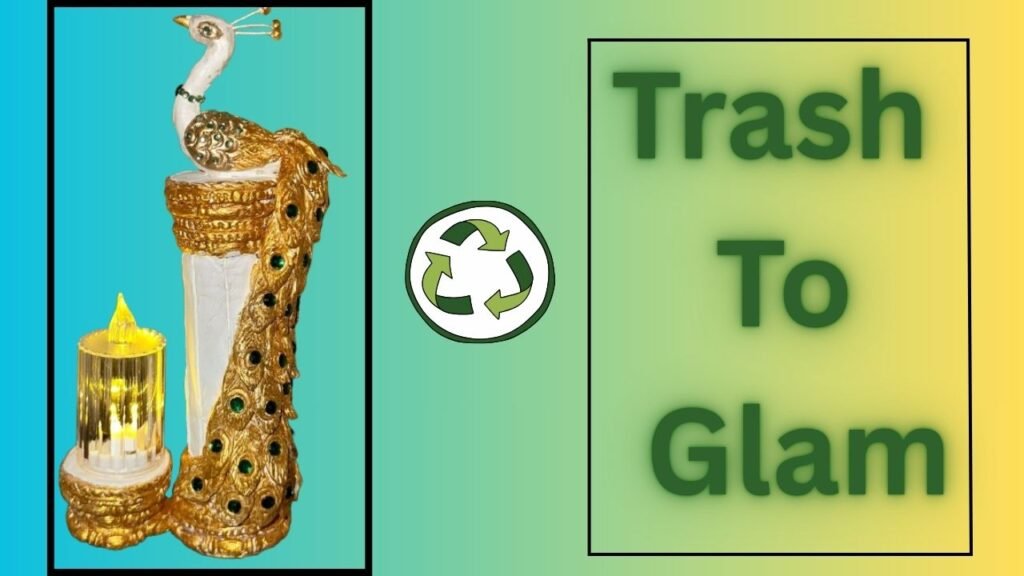
This Glam home decor candleholder is made out of one pill bottle and 6 pill bottle lids. I used Sculpey air dry clay but you can use homemade clay as well.
Materials Used
- Empty Pill Bottle
- Pill Bottle lids (i used 6)
- Air dry Clay (I used Sculpey Air Dry Clay)
- Metallic Acrylic paints
- White Acrylic Paints or Gesso
- Rhinestones
- Cardboard
- Masking Tape
- Flameless candle (Dollar Tree Or Anywhere)
- Glue Gun
- School Glue Or White Glue
Backstory:
It all started with a pile of empty pill bottles I had tucked away at home. Most people would toss them, but I saw potential. Every time I pick up an item, I study its shape, imagine how I could transform it, and browse the internet for inspiration. One day, it struck me, I could create a peacock perched elegantly on a pillar. From there, the idea evolved: why not turn it into a candleholder? Using the pillar bottle and a few lids, I brought my vision to life, turning ordinary trash into a sparkling piece of art.
For Full Video Tutorial Click below.
Written Step-By-Step Instructions
- I used 2 larger lids and two smaller lids from pill bottles and one pill bottle.

2. Next, I used scissors and a craft knife to remove the lock or plastic rim from the bottle, as I needed a smooth surface for my project.


3. Next, I Stuck a larger lid on the smaller lid to make bottom of the pillar

4. Next, I stuck the pill bottle on top of the two lids I just stuck.

5. To make this pillar stable I filled it with pebbles. You can fill it with sand or dirt or rocks or anything you want

6. Now I closed the mouth of the pill bottle by sticking smaller lid on it first and then larger lid.


7. Next I closed the bottom of the lids with cardboard

8. Next I covered the center part of the pillar with air dry clay sheets.


9. Next I embellished the top and the bottom part of the pillar using clay borders made with silicon molds and clay tools as well.


This is how it looks after this part is done

Next I made lines on pillar as shown.

10. Next I covered the top of the pillar with clay as well.


11. Next I started making peacock for which I shaped a piece of wire like bird body and covered it with aluminum foil to make a bird armature.


12. Covered the armature with clay sheet.


13. Then I gave the peacock its beak, eyes and the crown.


14. After the peacock body dried completely, I made wings for the peacock and made feathers on them with clay tool.


15. After the wings dried, I stuck the peacock on the pillar I made before.


16. I Used 8″ long sheets of aluminum foil and stuck them where peacock’s tail would be. I used 4 sheets so the tail won’t be flat and it will have some dimension.


17. using a small ball of clay I made several peacock feathers.


18. Next, stuck the feathers in layers all over the foil.


When all the feathers are stuck, this is how it looks.

19. painted the peacock with white acrylic paint. You can also use Gesso.

20. Next made the candleholder base as shown.


21. Next covered the candleholder base with clay.


22. First I covered the bottom of the pillar with a cardboard circle. When candle holder dried, I stuck pillar on it with glue gun.


I made the holder using two lids of the pill bottle exactly the same way as bottom and top of the pillar. So didn’t show ‘how to’ again.


23. Next I painted the peacock with Metallic Splendid Gold, Champagne Gold and Pearl white . Used mixture of Acrylic white paint and pearl white to paint pillar and top of the pillar.
24. Finally stuck green rhinestones on the tail, feathers, neck and eyes of the peacock.
Finally, this is how the peacock looked.

This is how it looks in the dark.

The main takeaway? Don’t be intimidated! This craft may look a bit complex, especially if you’re not used to sculpting, but it’s actually beginner-friendly.
If working with a wire armature feels daunting, you can easily make the peacock armature from cardboard instead. It works just as well.
In my newsletter, I’ll show you how to make the peacock armature entirely from cardboard. I’ll share a quick video.
Final Note:
Pill bottles often get a bad rap, and most of us want to toss them as soon as we can. But with a little creativity, these ordinary items can be transformed into something truly beautiful.
I hope you’ll give this craft a try, it’s a fun way to see everyday things in a new light!
For more craft ideas please subscribe to my monthly newsletter. Also, please leave a comment. I’d love to hear your thoughts and see your creations.
Thanks so much for stopping by, as always!
You might also like these crafts.