
Description
Repurpose old T-shirts with 4 easy bleach tie-dye methods! No dye needed—just bleach, bands, and creativity.
Materials Used
- Old T Shirts (you can use new tees as well)
- Bleach (I used Clorox)
- Rubber Bands
- Stencil
- Tray
- Wired Stand
- squirt Bottles
- Paint Brush
- Bucket
- Hydrogen Peroxide
- Container
Backstory
I always thought tie-dye was a lot of work and required expensive dyes. But one day, I stumbled upon YouTube videos showing stunning tie-dye results using just bleach and easy Tie-Dye techniques. I was pleasantly surprised! Inspired, I decided to breathe new life into my old plain T-shirts. A great way to repurpose and save money!
To watch all four Tie Die techniques in One go, please click on the video below.
Video Tutorial
written step-by-step instructions,
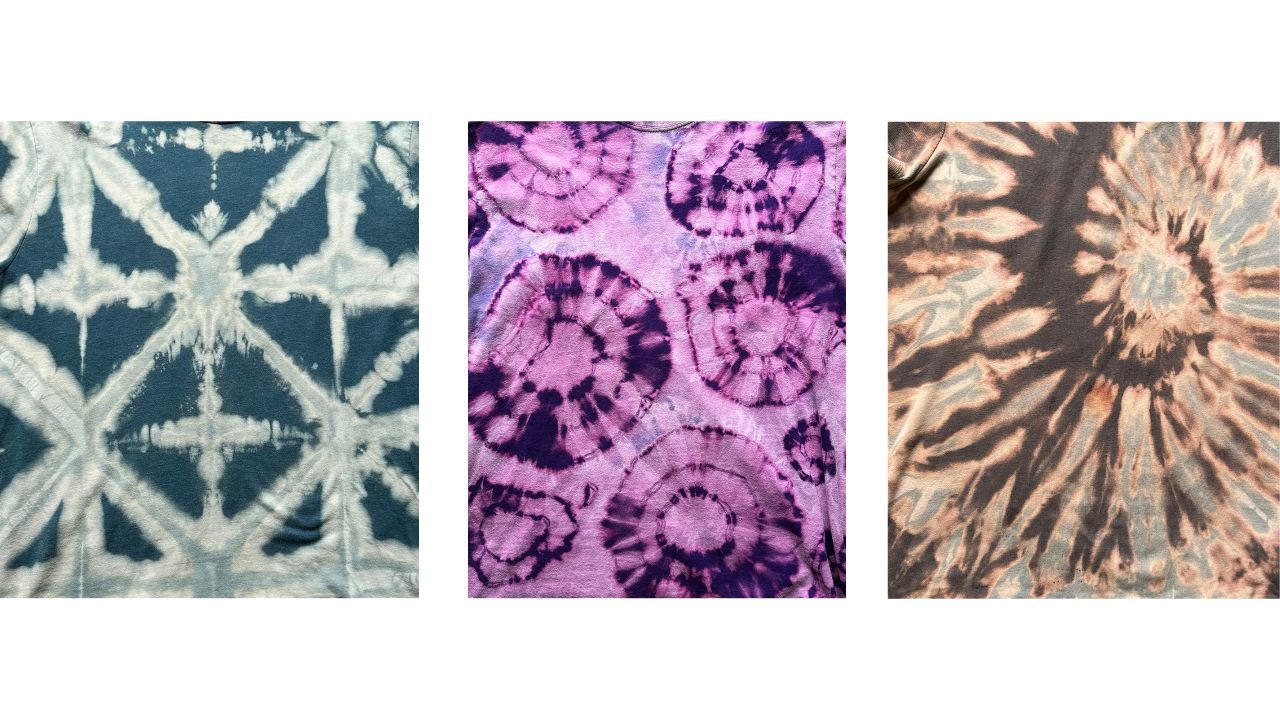
- Shibori Tie Dye Technique:

I. First Fold shirt in half, lengthwise.

II. Roll the half of the shirt back as shown. And fold the sleeve back too.

III. Next Flip the shirt and fold the other half the same way.

IV. Next start folding the shirt in triangle from bottom until you get a triangle as shown below.


V. Next Place cardboard triangle on both sides of of the triangle and cover the triangle with rubber bands.


VI. I mixed water and bleach in 1:1 ratio.

Dipped the shirt triangle in the solution.

VII. Next rest it on a rack for 15 minutes or until the shirt starts looking discolored.

VIII. Once the shirt is discolored take off the rubber bands and open the shirt. It happened in about 15 minutes. This time can vary.


IX. Wash the shirt with cold water

X. Next Soak The Shirt in Hydrogen Peroxide solution. This solution is 10 cups water + 1 Cup Hydrogen Peroxide

XI. Finally Hung the Tee to dry.

Watch this Tie Dye In action in the video below.
2. Spiral Tie Dye Technique
I. Take a wet cotton shirt. About as wet as it is before going in the dryer.

II. Pinch the shirt in the center and turn it in a spiral as shown.

Keep turning the shirt until you get a spiral pie.

III. To keep this pie together, wrap it with rubber band.

IV. Next Set the pie on the rack as shown. Then squirt bleach solution (bleach and water in 1:1 ratio) on half of the pie.

After squirting half of the pie flip it and squirt it on the underside of the squirted side.
V. Leave it to soak for 20-30 minutes. Take off the rubber bands and open the shirt.


VI. Next wash the shirt under tab water. Then soak it in hydrogen peroxide solution as I did for the first shirt. Finally hung it to dry.

To watch Spiral Tie Dye in action watch the video below.
3. Geode Tie Dye Technique:
I. Start with the wet shirt.

II. I pinched the shirt at any point on it and lifted both the layers of the shirt forming a peak and tied a rubber band tightly on it at two or three different places.


III. Continue doing this until the whole shirt becomes bunch of peaks with rubber bands wrapped tightly around them.

IV. Next I kept the shirt in a container and squirted same bleach solution (1 part water + 1 Part Bleach) on the shirt.


V. Rest the shirt in the container until the shirt loses its color. You can see the purple shirt changed to magenta or pink color. I took out all the rubber bands.

VI. Opened the shirt, washed it under the tab water, soaked it in Hydrogen Peroxide solution and hung it for drying.


To watch the Geode Tie dye technique in action click on the video below.
4. Painting With Bleach
- I used a dry T-shirt and placed a piece of cardboard inside it, roughly the same size as the shirt. This prevents the bleach from seeping through the front and staining the back while painting.


II. Placed the stencil on the shirt as shown. Then stuck it in place using masking tape so it won’t move while painting with bleach.


III. Using the 1:1 bleach -water solution I painted through the stencil as shown.


After stenciling, splattered the bleach with the brush on the rest of the shirt.

IV. After bleach dried Removed the stencil. Washed the shirt under the tab water, soaked it in Hydrogen Peroxide solution and hung it for drying.


To watch painting with bleach in action, watch the video below.
Tip
- I used old tees. But if you want to use new shirts, make sure you wash the shirts before tie Dyeing them.
2. Make sure to wear gloves while working with bleach.
3. Use of Hydrogen Peroxide is necessary to stop further action of bleach after Tie Dying is done.
Final Note
I hope you enjoyed this idea for repurposing old T-shirts!
If you’ve never tried tie-dye before, old shirts are perfect for experimenting — no worries if it doesn’t turn out perfect, since you’re giving new life to something you already had.
I hope you liked these Tie Dye techniques. I would like to hear from you. Please leave your comments and suggestions in the comment box below.
For more craft ideas, please subscribe to my monthly newsletter.
Happy crafting and Thanks for stopping by!