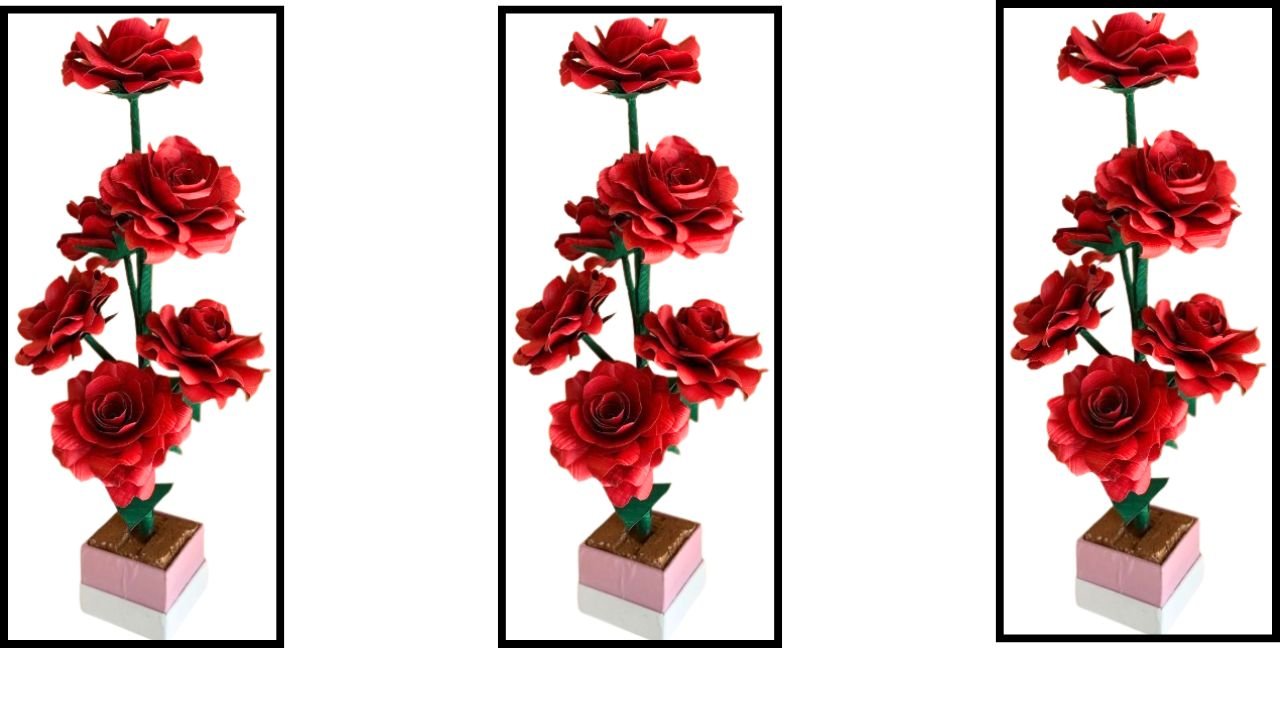

Description
Do you have discarded printed paper which you are going to toss in the shredder? Don’t toss them just yet, I’ll show you how to turn that trash into beautiful rose branch. To Make roses, I painted used printer papers with Red and Green Acrylic paints, but if you are short on time or do not wish to paint the papers, you can use colored craft papers as well.
Materials Used
- Used Printer paper (Or Colored Craft Papers)
- Acrylic Paints
- Glue Gun: https://amzn.
- Small cardboard Box
- Styrofoam
Optional Supplies on Amazon:
If you need to buy any supplies and choose to purchase them through Amazon, here are some affiliate links. I may earn a small commission at no extra cost to you. Thank you for supporting my work!
- Acrylic paints (https://amzn.to/43Ryvi1)
- Glue Gun (https://amzn.to/446dgdz)
- If you choose to buy red and green bond paper instead of painting (https://amzn.to/3TffT6J)
- Paint Brushes Round (https://amzn.to/4eeEtyx)
- Paint Brushes Flat (https://amzn.to/4kDghbi)
Backstory:
A while back, I had a stack of brochures lying around at home. I had already used some of them in a YouTube video where I made a giant flower and a floral backdrop using just brochure paper. But even after that project, I still had plenty left over and I didn’t want to throw them away.
One day, I came across a beautiful handmade rose made from painted white printer paper. It was inspiring, but instead of copying it directly, I decided to do my own take on the idea. I used used printer paper instead of new, and developed a completely different method to shape the roses.
Rather than making a single flower, I created an entire rose branch a sculptural showpiece made entirely from reused materials. It became a perfect little statement piece for my shelf, and I loved how it turned out.
Here’s the full video tutorial so you can craft along with me!
Step-By-Step Written instructions with photos + Video Timing
- Paint one brochure paper red. You’ll need one red sheet for each flower.so for 5 roses, prepare 5 red sheets. Video timing for this step starts at 10 sec

You’ll Need one and a half sheets of Green Paper for each rose. So for 5 roses, you will need to paint seven and a half sheets of papers.


2. Make rose with red paper.
Fold the red paper as shown in the steps below.
Watch this step for better understanding in the video above.
Step starts at 30sec.

3. Cut fourth of the red paper and keep it aside to make center of the flower. Then fold the paper again. Then fold it in half.
Video starts at 40sec. for this step.

4. Fold the paper in half and cut out the rectangles. Now you have six rectangles and one bigger rectangle I cut out in step. No. 3. I wanted only five layers of petals so I took out one small rectangle and now I have 5 rectangles and 1 bigger rectangles.
Video for this step starts at 45sec.

5. Used one small rectangle and cut out square out of it. I fold that small square as shown. The following step starts at 54 Sec in the video above.

6. Draw a petal shape On the folded square Make sure the center of the petal should be closed or folded point. the following photo shows folded point as a center of the petal.

once the petal is drawn, cut it out and open it.
Video for this step starts at 1:11

7. Make five petals like this. Then shape them with scissors as shown. Do the same with all five petals. The video timing for the following steps starts at 1:33


8. Arrange each petal layer slightly offset from the previous one to create a fuller, natural look. The video timing for this step starts at 2:05


9. Next I make center of the rose using the bigger rectangle which is forth of the red paper. I drew a spiral on it. Then I drew petals on the spiral and then cut it out as shown.
Video timing for this step starts at 2:25

10. After rolling this spiral it makes a small rose. which forms a center for the rose. Video timing for this step is 3:21

11. Stick the center in the rose. Timing for this step is at 3:52

12. Now I start making stem and sepal for the rose.
The timing for this step is at 4:01


13. I’ll make small stems with small rectangles and sepals using larger rectangle. To make the stems I wrapped the paper on the wooden skewers. And used a template to make sepal.
The video timing for this step is 4:25


14. I passed the stem through the sepal. Then cut the stem tip in four parts as shown. Using glue gun I stuck the stem and sepal to the rose. The video for this step starts at 5:06

15. Make a bit thicker stem using half sheet of green paper.
Video Time for this step is 5:25

16. Now that I have 5 roses and a thick stem, I put the branch together.
Video Timing for this step starts at 5:38

17. Next I fix Styrofoam squares in a small box I had at home. And make a hole in the center of the Styrofoam , filled it with glue and stuck the branch in it. Video timing for this step starts at 6:25

18. Final look of the branch. Video timing for this step is 6:46

Tips:
- Paint both sides of the paper for a more finished look.
- Don’t worry if some writing shows through the paint — it won’t be visible once the rose is assembled.
- After painting, the paper might feel a bit like plastic. When you fold and cut petals, it may seem like the layers are stuck. But they’ll come apart. Just be patient :-).
- Try to keep the flower stem thin so it can pass through the sepal easily.
- If you’re using colored craft paper, you can skip the painting step entirely!
Final Note:
I made this project using used printer paper and acrylic paints — it was a fun experiment! I had never tried crafting with hand-painted paper before, and I really enjoyed it.
But remember, you can always adapt this idea with materials you already have — that’s the beauty of crafting. Creativity has no boundaries!
If you enjoyed this DIY and the way I’ve combined video with step-by-step written instructions I’d love to hear from you.
For more craft ideas, subscribe to my monthly newsletter
Please checkout my other flower making blog posts. Links are below.
Happy crafting and thanks so much for visiting!

Hullo! Scoping out ff66. Short, sweet, and to the point! Could be a winner! Taking the plung. Good luck also!ff66
I am glad you liked it. Please send me a photo when you finish making your flowers. Happy crafting.