Description
This sculpture is made using discarded materials, a balloon, poster board, an empty tennis-ball can, and polymer clay. Although it looks intricate and highly detailed, it’s actually quite easy to create. It’s a budget-friendly project that transforms simple recycled items into an elegant decorative art piece.
Materials List
- A balloon
- Posterboard
- Clay (polymer or Airdry)
- Clay cookie Cutters
- Clay Tools
- Silicon molds
- White Acrylic paint
- Paint brush
- White Glitter
- Glue Gun
- Newspaper
- Empty tennis Balls can
- A plastic Bowl
- Scissors
- Masking Tape
- Cardboard
- Joint Compound/Powder
- Water
Backstory
I’ve always been fascinated by white marble sculptures. I know real marble carving is beyond my reach, but that doesn’t mean I can’t create my own imitation version. I’m not even sure how this design came to my mind, it just happened! And I’m truly surprised by how beautifully it turned out. The mind can surprise us in the most unexpected ways… sometimes in the best way possible.
Video Tutorial
Step-by-step written instructions
First, I gathered a poster board, a bowl, an empty can of tennis balls, masking tape, and a balloon.
Next, I rolled the poster board into a cone shape and placed a balloon inside the cone to make sure the size of the cone was as desired.
2. Next, using masking tape, I taped the cone shape so it stayed intact. The cone was too tall, and since I wanted it to look like a vase, I cut about 2 inches from the bottom of the poster-board cone. Then, I trimmed the extra poster board at the large opening to shape it into a circle.
3. Make sure the cone stands on its own. That way you know if its level or not.
4. Close the bottom of the cone with a cardboard circle.
Next, Using a cardboard ring make the mouth of a plastic bowl wider and stick the bowl upside down on the cardboard circle as shown.
5. Cut the top ring off the tennis-ball can and cut the top into strips. Then cut off the bottom and cut strips on the bottom of the can as well.
Next, place a balloon inside the cone. Then place the tennis-ball can on top of the balloon, with the strips spread out over the balloon. Attach the can to the balloon, and the balloon to the cone, using masking tape.
6.The other end of the can is also cut into strips. These strips are shaped and connected to form the mouth of the vase, using masking tape as shown. This is going to be a vase vshaped sculpture not a vase.
7. Next, cover the structure with paper mache using paper pieces and a school-glue-and-water solution. You can apply two to three layers of paper pieces.
8. After the paper mache dried, I covered the structure with pre-mixed joint compound. After the joint compound dried, it developed some cracks, so I made a dough using powdered joint compound and water. I applied this dough over the structure, and it filled and covered the cracks.
9. Since this isn’t a vase I placed another plastic bowl (same as I used at the bottom of the structure) to cover the mouth of the structure. And covered the bowl with join compound.
10. after the joint compound dried, I sanded it for smooth surface.
11. Next, I made decorative borders and motifs using silicone molds and air-dry clay. I attached the decorative borders with school glue, and after the flowers dried, I glued them on using a hot-glue gun.
12. Different size flowers were made using clay cookie cutters and air-dry clay (polymer clay can also be used for the flowers). After flowers dried or baked they were stuck on the structure.
13. Using polymer clay, I made the birds. First, I rolled a ball of clay and shaped it into a small cup or bowl. I filled it with a crumpled newspaper ball, closed it, and shaped it into a bird’s body. Then I made the beak and eyes, and decorated the bird’s wings using clay tools. Then bake the birds.When birds cool down stick them on the base.
14. First arrange the birds on the base. When I was happy with the arrangement, I glued the birds in place.
15. After the birds were glued in place, I painted the sculpture with white acrylic paint. Once the paint dried, I mixed Mod Podge with white glitter and applied the mixture to the entire sculpture.
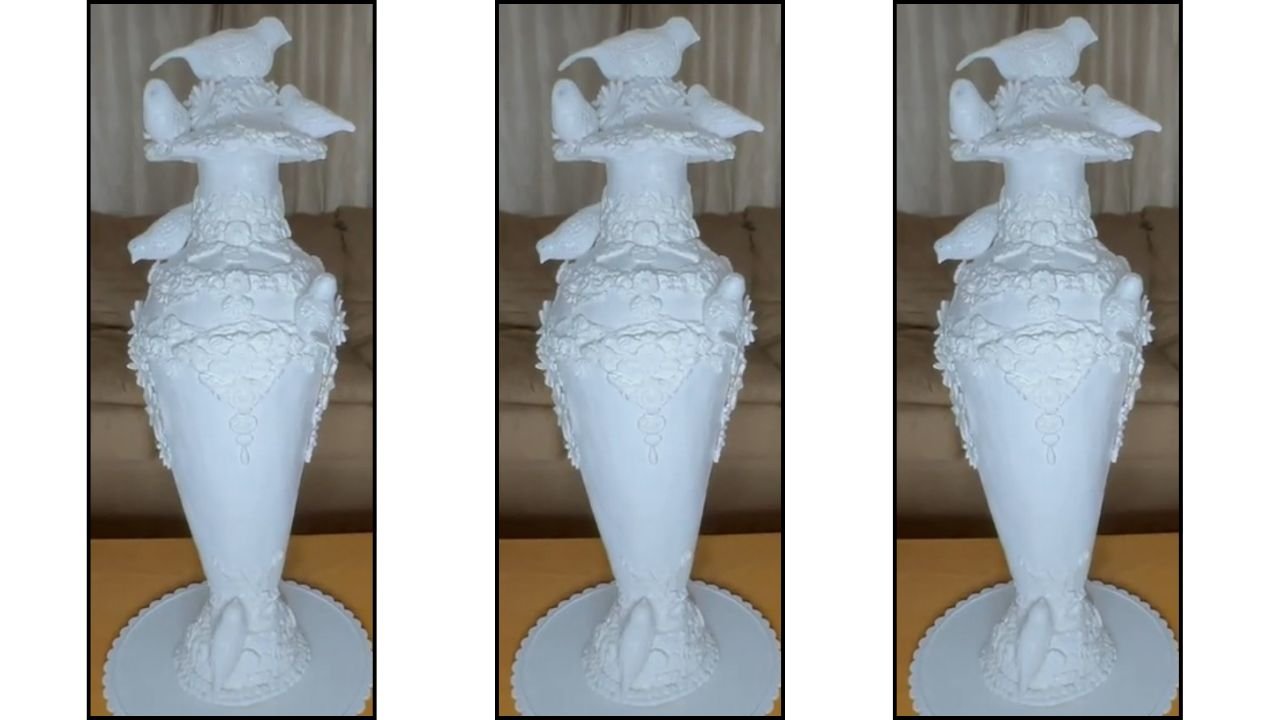
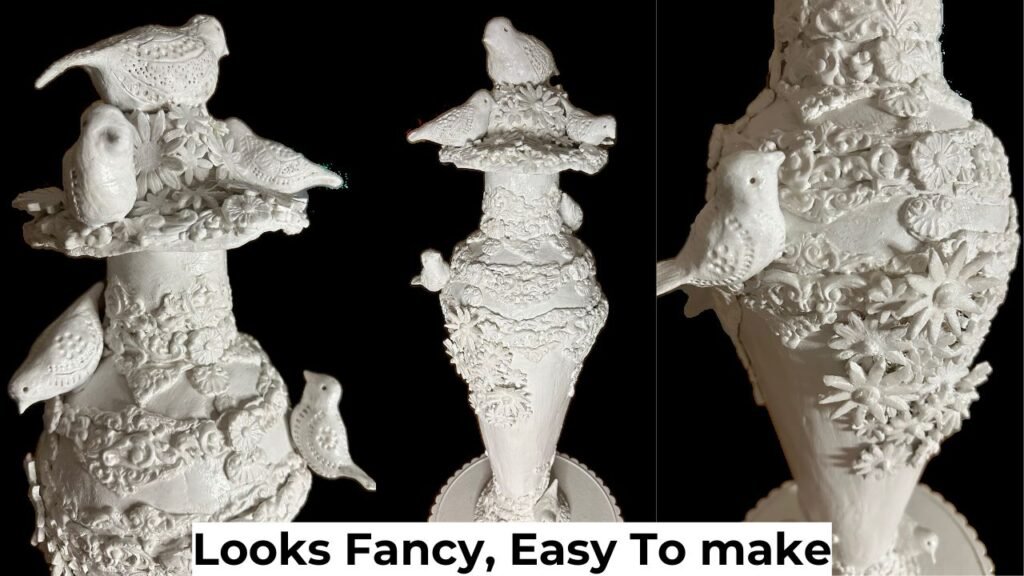
16. After the mod podge dried, this is how the sculpture looks!
Tips And Tricks
Instead of polymer clay, you can also use air-dry clay to make the birds.
Feel free to experiment with different colors.
While making the flowers, dust the clay with cornstarch so it doesn’t stick and the cookie cutters cut cleanly.
I forgot to pop the balloon inside, but you can pop it if you want — it won’t harm the structure even if the balloon stays unpopped.
- I used white glitter to give the sculpture a soft sheen. If you want a little extra dazzle, you can add silver glitter instead, or simply apply varnish for additional shine.
Final Word
I hope you liked this idea of turning budget-friendly, recyclable, or discarded items into a sculpture that looks like a marble piece. You don’t need any special skills to make this sculpture. If making clay birds feels intimidating, you can simply use silicone molds to decorate the sculpture instead.
Make sure to check out my other eco-friendly and budget-friendly crafts on this blog. Please subscribe to receive my monthly newsletter for more creative ideas.
Thanks for stopping by, happy crafting!