
Description
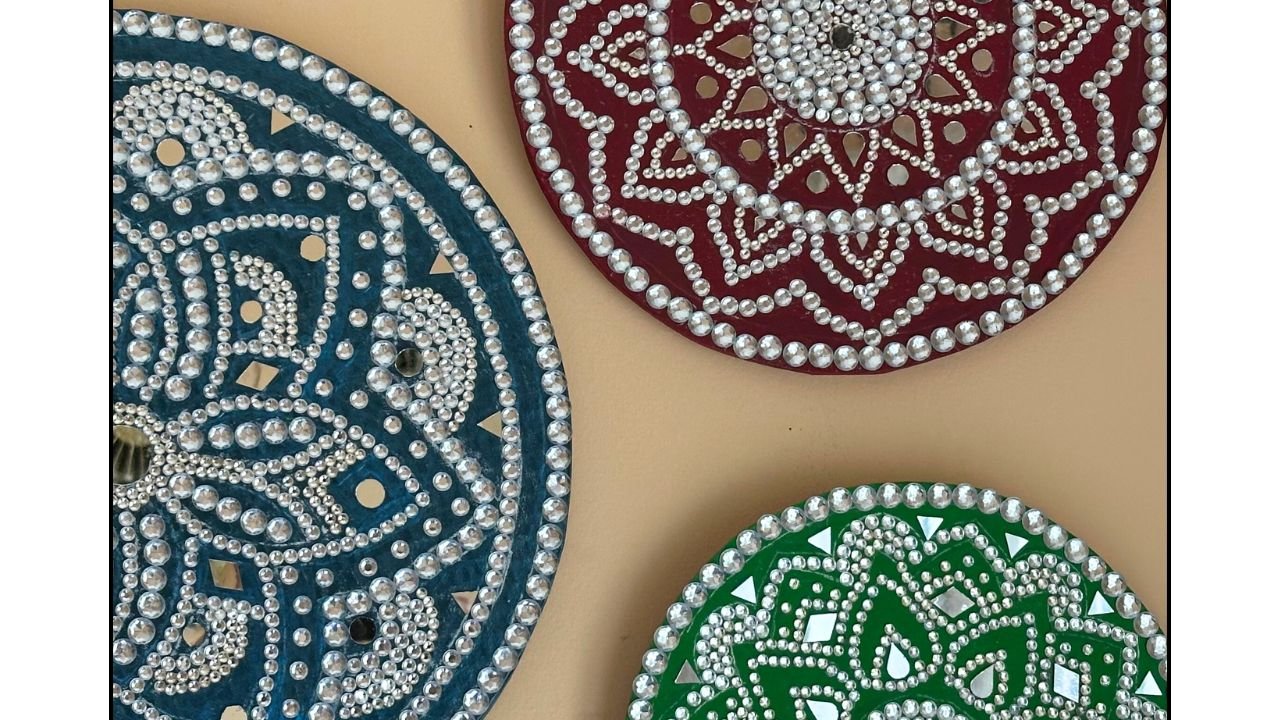
Mandala art on cardboard circles with rhinestones and mirrors — easy yet intricate DIY wall décor that dazzles and rewards your patience.
Materials Used
- Cardboard Circle
- Rhinestones
- Craft Mirrors
- Acrylic paints
- School Glue
- Transfer Paper
- Pencil
Backstory
I’ve always been drawn to mandala art. There’s something so meditative and beautiful about the symmetry and flow. But I’ve also felt a bit intimidated by it. Especially when it comes to painting perfect shapes or creating dot mandalas. I admire those who can do it with ease! Where as I am concerned, I tend to get nervous with that kind of painting!
Still, I really wanted to make mandala-inspired art. Since I love working with rhinestones and am always looking for new ways to use them, I thought, why not create a mandala without any painting at all? That’s how this project was born: a unique mandala wall art made with rhinestones and craft mirrors instead of traditional paint. It’s a great way to enjoy the beauty of mandalas in a style that suits me better.
If you wish to watch video tutorial, please click on the video below.
For those who prefer Step-By-Step Written Instructions
- Cut out a 15″ diameter circle out of cardboard.

2. Covered the edge of the circle with masking tape.

3. Next applied white acrylic paint as a primer. You can apply Gesso instead.

4. Applied Metallic Blue + Black paint on top after white paint dried completely.


5. Using a transfer paper for colored surfaces, I transferred a mandala line drawing on the circle.


6. I applied school glue on the circle and stuck biggest rhinestones
(I had )on the circle.

7. Below are the photos that show the progress of the project from start to finish.

Next I use smaller rhinestones and stick them in the circle as well.


8. I stuck two rings of cardboard using masking tape. Turned over the cardboard circle and stuck the ring on the back of the circle. The ring became the hanger for the mandala wall art.


9. I made other two mandalas the same way and the wall decor looks as follows.

Tips
- Take Your Time: As I mentioned earlier, this craft requires patience. To keep it enjoyable, work in short sessions. Try crafting for 15 minutes at a time, take a break, and return when you feel refreshed. This helps prevent fatigue and keeps the process fun.
- Customize the Colors: You don’t have to use the same colors I did. If you prefer subtle tones over vibrant ones (or vice versa), go for whatever palette makes you happy. Make it your own!
- Try Other Materials: Instead of rhinestones, you can experiment with materials like half pearls or glass pebbles. Just keep in mind, the pebbles can make the wall decor heavier, so be sure your hanging method is sturdy.
- Cardboard vs. Canvas: You might prefer using a canvas panel instead of cardboard. Canvas is less likely to warp and gives a more polished finish.
- Prevent Warping: I used thick cardboard circles to minimize warping. I also covered the edges with masking tape instead of paper strips and glue, since glue can cause the cardboard to warp.
- Prime the Surface: When working with cardboard, always prime the surface before starting. This helps with both durability and paint or glue adhesion.
Final Note
I hope you liked my idea of creating mandala in a unique way. I would love to hear from you. Please leave a message below in the comment section. For more craft ideas, please subscribe to my monthly newsletter.
Please checkout more of my dazzling crafts on the blog. The links are below.
Happy crafting and thanks for visiting!
This post presents clear idea in favor of the new viewers of blogging, that actually how to do running a blog.
Assistive Technology
Thank You!!