Description:
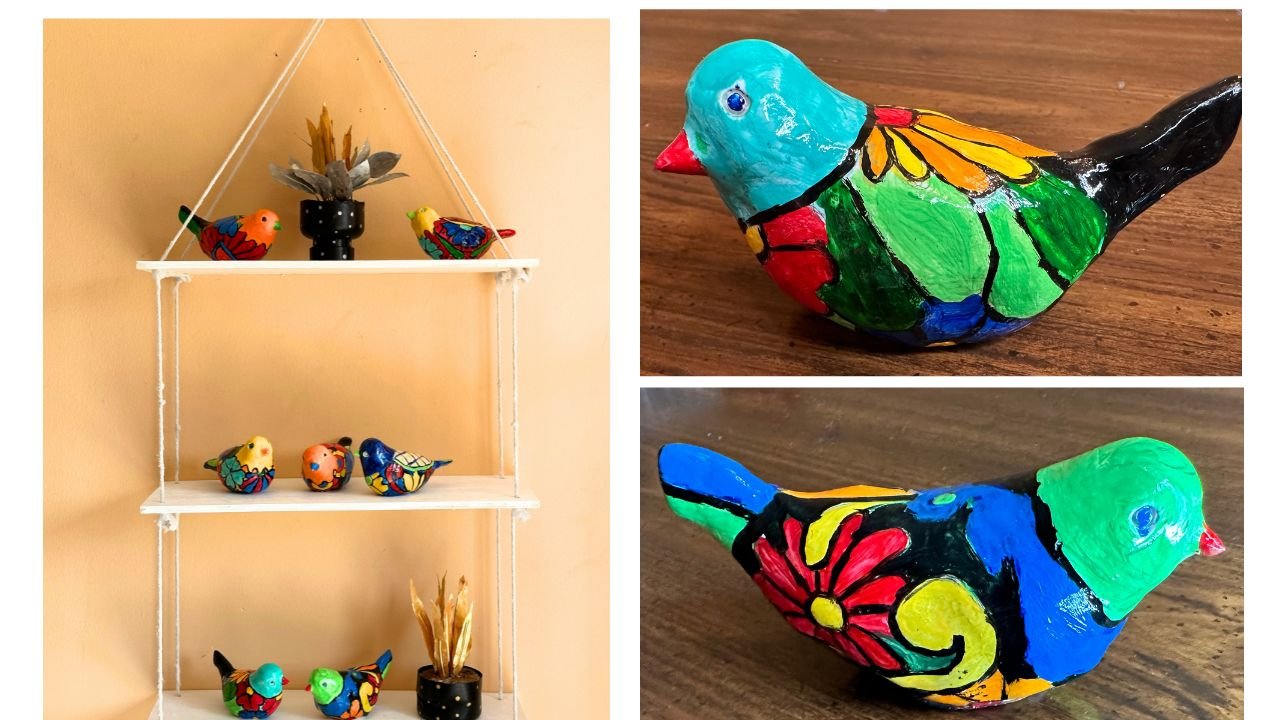
Can you believe these birds have a some newspaper hidden inside them? That’s how I made them lightweight and used less clay, hence making it more affordable! I’ve found this to be the easiest way to sculpt birds, and it’s so simple that even kids can give it a try.
For the final touch, I painted them in a style inspired by Talavera pottery. I love Talevera Style bold colors, floral patterns, and a folk-art feel. These cheerful birds make great decorations for Patio, Gardens or even on Walls in your home.
Materials Used
- Sculpey Original Polymer Clay
- Newspaper or Aluminum Foil
- Clay Tools
- Acrylic Paints
- Paint Brushes
- Varnish
Backstory
I’ve always loved Talavera-style pottery. Whenever I’m drawn to an art form, I feel an urge to try it myself if there’s even a small chance I can. One day, I came across a big box of Sculpey Original polymer clay with a 60% off coupon, and that was all the encouragement I needed.
I turned to the internet and found one of the easiest ways to sculpt clay birds . I chose to make polymer clay birds. Once the birds were ready, I transformed them by painting them in the vibrant, folk-inspired Talavera style, giving them the look of tiny ceramic treasures. And that is how these birds were born!
Video Tutorial
This video tutorial visually demonstrates each step outlined in the written tutorial in real time, helping to clarify the process and reduce any confusion.
Step-By-Step Written Instructions
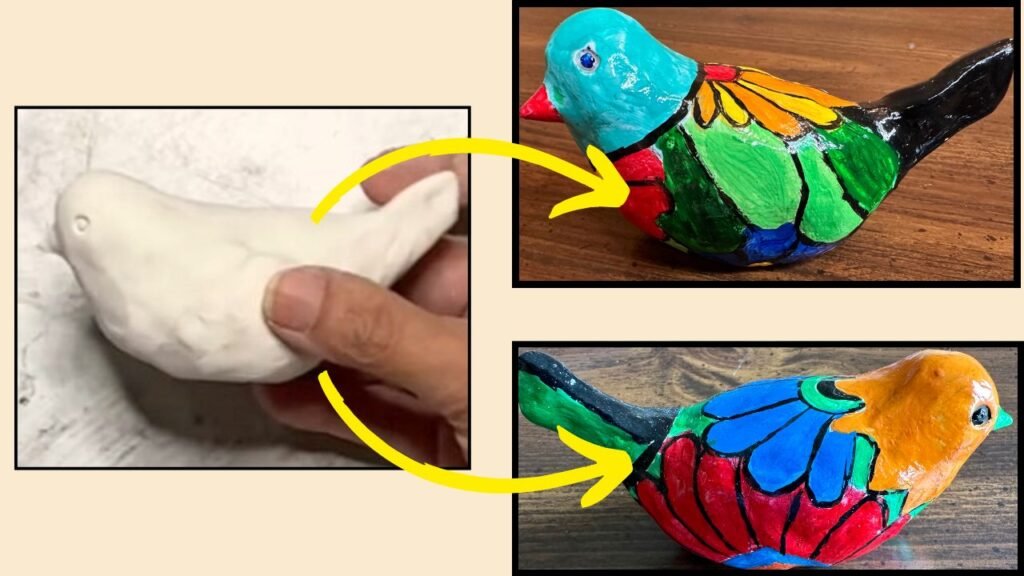
- Take a ball of polymer clay about the size of a golf ball or larger or smaller, depending on how big you want your bird to be. Insert the end of a rod or the back of a sharpie marker into the center of the ball to create a deep indentation. Then, use your fingers to gently shape the clay into a small bowl.
2. Fill this bowlwith newspaper and shape it like a bird body.
3. Next make beak and eyes on the bird. I used Clay Tool and a ball point pen to make bird’s face. Made a hole in the birds head and inserted clay to make a beak. Then used pen to make eyes for the bird.
4. Next bake the polymer Clay birds in the oven at 275 degrees Fahrenheit for an hour. Although the bird body is quite hollow, its head is not! So I baked clay birds for 45 Minutes to be on safe side.
5. After the birds were baked and cooled down I drew flowers and leaves on them Talavera style.I took inspiration from designs on several Talavera pottery pieces.
6. Next, painted the birds with bright acrylic paints. After the paint dried, applied gloss varnish on them.
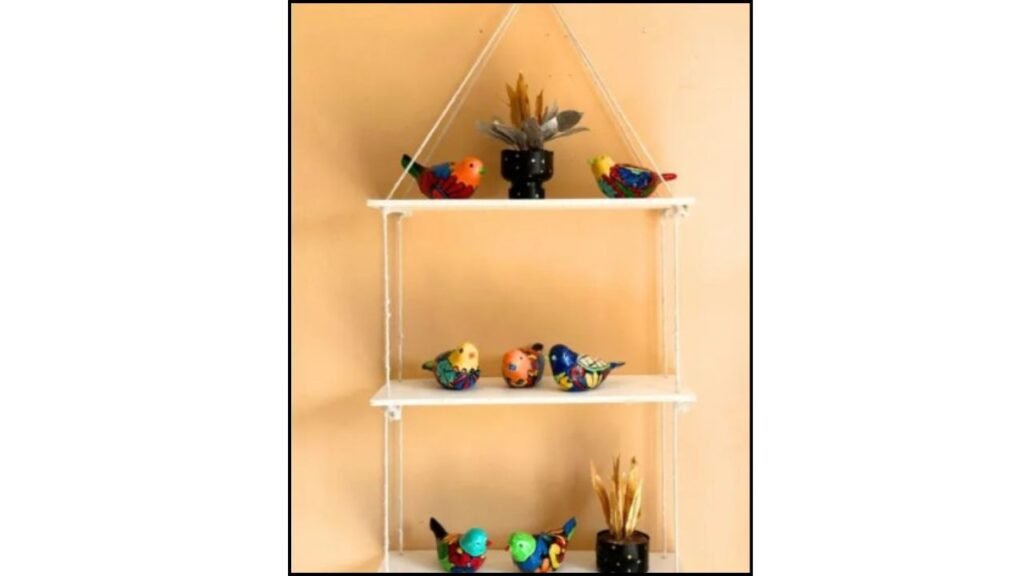
This is how the birds look once they are fully painted and varnished. I’ve styled them on a shelf as home or wall decor, but they also look lovely displayed in the garden, on a wall or nestled among plant pots.

Tips And Tricks
- You can also use air-dry clay if you don’t have polymer clay. Just make sure to let it dry completely before painting.
- Instead of newspaper, aluminum foil works well too. It gives a firm shape
- I painted my birds in Talavera style, but feel free to explore your own style. Try abstract designs, bright patterns, or even a realistic bird look!
- If you happen to overbake the clay birds slightly, they may darken or get a little scorched. But don’t worry! Since they’ll be painted, it usually won’t show. That said, always use your own judgment and be sure to follow the baking instructions on your specific brand of polymer clay.
Final Word
I’ve realized that while photos are helpful, they don’t always capture the full process, especially for hands-on crafts like this. That’s why please make sure to use written instructions with the video tutorial above. This will make the process more enjoyable.
I would love to know your thoughts on this approach, so I can keep improving and make my blog as helpful and enjoyable for you as possible. Feel free to leave a comment. I truly appreciate your feedback!
Please consider subscribing to my blog to receive a monthly newsletter with more craft ideas.
Happy crafting and thanks for visiting!